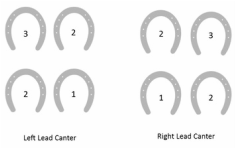
 Footfall at the Canter Footfall at the Canter I have noticed in recent years that more riders are standing at the canter. Of course it is okay to stand at the canter, but can you sit comfortably too? Let's begin by evaluating your canter departures. Do you notice your horse lift its head or slow down when you ask it to go forward into the canter? Maybe your horse falls in or turns to the inside and you try to correct this with your outside rein? Perhaps your horse takes multiple steps at the trot before making its way into the canter? Ideally your horse should willingly stay straight and rhythmical from the walk or trot into the canter. Understanding the mechanics of the canter for the horse and rider will not only help set up positive canter departures, but will go a long way to improving the canter overall. All too often riders are taught to use their hands to “set up the lead” which results in the rider pulling the horse in a variety of directions and does not encourage or allow the horse to travel in a straight line. It is the rider's responsibility to stay in balance over his/her own center of balance and the horse’s center of balance. Standing at the canter becomes a habit that often times results in a rider ahead of the horse’s center of balance. Horses tend to naturally move themselves to stay underneath the rider. With that in mind, it is easy to see how a horse can begin to fall on its front end with a rider that consistently stands ahead of the motion at the canter. How can you stay in balance during the departure and set yourself up to remain in balance during the canter? Let’s start with the horse’s footfall during the canter as shown in the diagram. The movement of a horse’s leg(s) makes up a beat. The canter has three beats beginning with the outside hind leg as beat one. The horse’s inside hind leg and outside foreleg make up beat two. Beat three is the inside foreleg (the lead leg) on the horse. Next, consider the horse’s momentum during the three beats of the canter beginning with the first beat – the horse’s outside hind leg engages underneath its body, causing the horse’s front end to elevate slightly to allow for the engagement. The second beat is when the horse’s body weight is centered across itself as the horse engages the inside hind leg and outside foreleg. The third and final beat is on the inside foreleg and allows for the horse’s balance to be at the most forward position during the three beats. Do you ever feel confused by what part of you controls what part of the horse? Here is a simple way to assign parts of you, the rider, to the correct parts of the horse. Initially, consider that from your waist down controls from you back and from your waist up (including your arms, hands and head) controls from you forward on the horse. Then, the right half of you from your waist down controls the right part of the horse from you back and the left lower part of your body controls from you back on the left side of the horse. The right side of your upper body controls the right front half of the horse and the left side controls the left front half. Focusing on assigning the correct parts of the rider’s body to the corresponding parts of the horse will great improve the communication between the two. When you put everything together this is how it will work. As the horse prepares for beat one of the canter you will bring your outside leg back slightly behind the girth to cue the outside hind end of the horse to engage. Your elbows are bent the most that they will be during the canter and you will be seated evenly in the saddle. Your body weight follows the natural movement of the canter allowing your center of balance to shift to the middle during beat two, while both of your legs are relaxed and elbows are soft as they become less bent while your horse stretches its head and neck forward. During beat three you and your horse will be what I like to call “leaning on the front half of your balance” for one stride. This allows your elbows to stay soft without locking and will help you from losing your balance during this stride. If you have the opportunity to be videotaped during the upward and downward transitions and the canter, I encourage you to do so. Pause the playback during each phase of the canter to see if your position is close to where you need it to be. The capability to playback in slow motion will also be valuable in helping you learn what you need to keep doing and what you need to improve on. The more you practice your timing and positioning in the canter the easier it will be to sit or stand, because you will be in better balance and harmony with your horse.
1 Comment
 This is a continuation of my post The Start of Something That Will Last.
One of the factors that motivated me to focus on my lower leg within the development of my system was the increase in the amount of times I heard my students say that they were using their leg but getting no response from the horse. Riders would get frustrated and blame the horse, I would get frustrated and blame the rider and/or the horse, and the horse would blame no one, but tune all of us out. There simply had to be better way. Horses are supposed to move away from a rider’s leg pressure. This is not necessarily something they instinctively know. It is something that must first be taught to the horse and then reinforced for the remainder of its riding career. While working with Presto, I found the alternating leg that followed his natural movement at the walk allowed me to reinforce Presto’s training about moving off of my leg. By improving the timing of my leg, I gained an almost superhero strength to communicate with him. While we always want to go straight, it was time to add some turns. In my mind, it made sense that if I increased leg pressure in one leg more than the other, Presto would move away from that leg pressure and turn. Imagine my surprise when I did this and nothing happened. As I tried it again, I did what I often encourage my riders to do. I “observed” my own aids and realized that when I focused on the outside leg pressure increasing, I forgot about my inside leg’s job and therefore stopped communicating anything to Presto – hence no response. This time I isolated my outside leg (and made it stronger), kept the alternating rhythm of the lower leg (and allowed the inside leg to be softer), then added in visualizing what I wanted (a turn) and Presto instantly responded. The best part? He never lost forward impulsion or rhythm throughout the turn. We set about practicing turns that allowed me to commit my correct lower leg aids during the approach , the turn and the line away to muscle memory. With a goal to practice it right instead of wrong, I focused on planning in advance where I wanted the turn to be in a way that set both Presto and I up to succeed. Ready to get started practicing turns? It may be easiest with a turn that cuts across the ring. Make sure that there is plenty of time after the turn to ensure straightness from your leg and time to prepare for the turn either in the same or opposite direction. Be careful not to rush the aids or stop communicating your intention to your horse. Try a serpentine next. Serpentines allow for lots of practice on turns and straight lines to help balance the horse. Finally, practice a proper half-turn that begins with a small round half circle and ends with a straight line back towards the original track. It is important to avoid closing your leg on your horse's side and leaving it there for prolonged periods of time. Horses tend to lean into a consistent pressure which is the opposite of the goal to have the horse move away from your leg pressure. At this point your hands should be in the correct location with a straight line from your bent, soft elbow through your wrists and hands to the corners of your horse's mouth. Your hands should also be at least the width of your horse's mouth. Unsure what that is? Before you put your horse's bridle on hold your hands up to the bit. That is approximately how wide your hands should be apart. Remember, they should never be closer together than that, but they can always be a little further apart and not have a negative effect on the horse's mouth. Don’t forget, whether you are just learning to ride, experienced or somewhere in between it always takes time to create muscle memory. Rome wasn’t built in a day and neither will your lower leg. I love the comments and encourage you to continue to share your thoughts or questions. 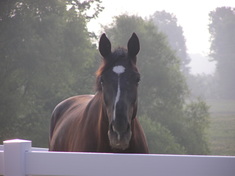 Presto Presto They say timing is everything, and I can’t think of a truer statement to describe how my teaching and riding system began to solidify for me. I have always counted on repeating the information that worked in the past and trying out new things when I could. It turned out that this was invaluable to building the foundation of my system. A couple of years ago I reached a point in my teaching when I began to see places for improvement. I was becoming frustrated that I couldn't get my point across to my students and I could tell that the horses were becoming less willing.
At the same time I had reached a point where I truly missed riding. I got into this business because I love horses, riding and teaching, not for the countless hours standing in the middle of the ring at the in-gate or in my office doing paperwork. If for nothing else, I needed to be reminded of why I had chosen to do this every day. Presto played a huge role in the realization that I wanted to define and develop my own system of training. I had known Presto since he first arrived to the United States as a very young horse. He was imported by a good friend of mine and purchased by one of my students who has remained one of my closest friends over the fourteen years since we first met. After years as a show horse and a variety of medical problems he was on the brink of giving up altogether. This once vibrant, outgoing and lovely gelding had become sullen, recalcitrant and generally miserable in the two years since he had been donated to the riding program. As summer vacation began, Presto and I went to work. Having known his training and work program for ten years, I knew what Presto was capable of. This gave me a lot of confidence as I knew that a very well-trained horse was somewhere in there. I vowed to spend more time listening to him which helped me recognize his anxiety about being ridden alone without another horse in sight. Despite the beautiful weather outside he seemed more focused and less anxious when we worked indoors. I was feeling a little anxious because I was very out-of-shape. It was a great excuse to take things slowly. It didn’t take long to realize that he had simply gotten away from his basic training. Since I believe that a correct basic design of position for the rider is paramount to the horse being able to perform the requested maneuver I made sure that I was sitting in the center of the saddle and in balance. How can you find your center of balance? Imagine if you could divide yourself in half (left side and right side and front to back) where those two places meet is your center of balance. Once you find it, then practice keeping your center of balance quiet at the walk, during a turn and during the transition from halt to walk and walk to halt. You should start to see your horse become more willing, stay straight during the transitions and improve consistency simply by improving your center of balance. Presto was still only traveling on a temporary straight line and I found myself fighting the urge to micromanage him with the reins. The solution was correcting my leg first at the walk. I was using an alternating leg, but without purpose and certainly not always in rhythm with the walk. How can you do this? First, allow your lower leg to rest softly against your horse’s sides. Then using your lower leg, feel when your horse’s side shifts from the left to the right and notice how it will shift back from the right to the left. This is easier to feel on some horses than others, so if you don’t feel it right away, do not get discouraged. You will feel it and be that much better for it. Once you find that movement allow your lower leg to follow the movement. When your horse’s side moves from the left to the right, allow your lower left leg to follow the movement and your lower right leg to relax. Then allow your right lower leg to follow the movement back to the left lower leg (which is relaxed). Back and forth until you have committed the movement to muscle memory. If you apply both legs with equal pressure, you are directing your horse to travel in a straight line. Back that up with a quiet center of balance and your horse will always have the opportunity to travel straight, and you don’t have to overuse the reins. It’s amazing how simple things become when you allow your horse to travel in a straight line. All too often I hear riders claim that a horse is really crooked or falls in through the turns. The majority of the time this is a result of the rider leaning in or sitting crooked. Wonder why your horse is missing a lead change? More than likely it is because the horse isn't straight. Once I became more consistent Presto started to become more consistent. By correcting my lower leg usage first at the walk, I improved my timing which allowed for Presto to relax. This allowed him time to respond to my aids and improve his connection from his back end to his front end. In addition to all of those positive things, I was beginning to feel more secure in the tack. This allowed me to relax and for Presto to start to trust me. Once I earned his trust, he began to try harder for me. This was the start of something that will last, this was the start of my system. Next up, You Can’t Go In a Straight Line Forever, What to Do When You Want to Turn. |
Megan Taylor
Horses were my first true love and two bay horses stand out as having a significant impact on my life. As a student, rider, owner, trainer and coach I have had the opportunity to experience horses from every side. These experiences have shaped my training system for riders and horses that creates a positive working relationship between both. Archives
August 2018
Categories |
 RSS Feed