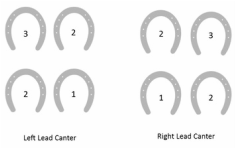
 Footfall at the Canter Footfall at the Canter I have noticed in recent years that more riders are standing at the canter. Of course it is okay to stand at the canter, but can you sit comfortably too? Let's begin by evaluating your canter departures. Do you notice your horse lift its head or slow down when you ask it to go forward into the canter? Maybe your horse falls in or turns to the inside and you try to correct this with your outside rein? Perhaps your horse takes multiple steps at the trot before making its way into the canter? Ideally your horse should willingly stay straight and rhythmical from the walk or trot into the canter. Understanding the mechanics of the canter for the horse and rider will not only help set up positive canter departures, but will go a long way to improving the canter overall. All too often riders are taught to use their hands to “set up the lead” which results in the rider pulling the horse in a variety of directions and does not encourage or allow the horse to travel in a straight line. It is the rider's responsibility to stay in balance over his/her own center of balance and the horse’s center of balance. Standing at the canter becomes a habit that often times results in a rider ahead of the horse’s center of balance. Horses tend to naturally move themselves to stay underneath the rider. With that in mind, it is easy to see how a horse can begin to fall on its front end with a rider that consistently stands ahead of the motion at the canter. How can you stay in balance during the departure and set yourself up to remain in balance during the canter? Let’s start with the horse’s footfall during the canter as shown in the diagram. The movement of a horse’s leg(s) makes up a beat. The canter has three beats beginning with the outside hind leg as beat one. The horse’s inside hind leg and outside foreleg make up beat two. Beat three is the inside foreleg (the lead leg) on the horse. Next, consider the horse’s momentum during the three beats of the canter beginning with the first beat – the horse’s outside hind leg engages underneath its body, causing the horse’s front end to elevate slightly to allow for the engagement. The second beat is when the horse’s body weight is centered across itself as the horse engages the inside hind leg and outside foreleg. The third and final beat is on the inside foreleg and allows for the horse’s balance to be at the most forward position during the three beats. Do you ever feel confused by what part of you controls what part of the horse? Here is a simple way to assign parts of you, the rider, to the correct parts of the horse. Initially, consider that from your waist down controls from you back and from your waist up (including your arms, hands and head) controls from you forward on the horse. Then, the right half of you from your waist down controls the right part of the horse from you back and the left lower part of your body controls from you back on the left side of the horse. The right side of your upper body controls the right front half of the horse and the left side controls the left front half. Focusing on assigning the correct parts of the rider’s body to the corresponding parts of the horse will great improve the communication between the two. When you put everything together this is how it will work. As the horse prepares for beat one of the canter you will bring your outside leg back slightly behind the girth to cue the outside hind end of the horse to engage. Your elbows are bent the most that they will be during the canter and you will be seated evenly in the saddle. Your body weight follows the natural movement of the canter allowing your center of balance to shift to the middle during beat two, while both of your legs are relaxed and elbows are soft as they become less bent while your horse stretches its head and neck forward. During beat three you and your horse will be what I like to call “leaning on the front half of your balance” for one stride. This allows your elbows to stay soft without locking and will help you from losing your balance during this stride. If you have the opportunity to be videotaped during the upward and downward transitions and the canter, I encourage you to do so. Pause the playback during each phase of the canter to see if your position is close to where you need it to be. The capability to playback in slow motion will also be valuable in helping you learn what you need to keep doing and what you need to improve on. The more you practice your timing and positioning in the canter the easier it will be to sit or stand, because you will be in better balance and harmony with your horse.
1 Comment
Lyn
1/23/2016 04:03:14 am
Time for January's post ! Leave a Reply. |
Megan Taylor
Horses were my first true love and two bay horses stand out as having a significant impact on my life. As a student, rider, owner, trainer and coach I have had the opportunity to experience horses from every side. These experiences have shaped my training system for riders and horses that creates a positive working relationship between both. Archives
August 2018
Categories |
 RSS Feed